
I feel like the contents of this post have the potential to be a bit controversial. It covers topics that seem to evoke strong opinions. But I just think people put too much pressure on themselves (and on other van converters) when it comes to insulation, sound deadening and vapour barrier. Having converted one van already and dealt with the stress before, this time around I have a new approach to it all:
There are no perfect answers. Some insulation is better than none. A vapour barrier is probably a good idea, but not essential. Sound deadening is a nice-to-have, not a must-have. You should definitely put windows in before doing all of the afore mentioned, but I didn’t. More than anything what I’d like is for this blog post to put your mind at rest if you’re converting a van; there’s very little you can do that will actually result in disaster, and some of the pros vs cons are so minimal that its unlikely you’d even notice the difference.
It’s important to remember that these updates are more a documentation of what I’ve done and why than they are an instructional guide for you to follow.
Right, here goes…
Sound Deadening
I’ve seen lots of info regarding the use of a product called Dodo mat for sound deadening, it’s meant to be great. However, it’s quite expensive and I didn’t have any. What I did have, and therefore what I used, was some sort of bitumen backed flashing that I think is used for roofing. I had a couple of rolls left over from my last van, and it worked well enough in that. It just needs heating with a heat-gun/hairdryer for a few seconds and then sticking to the sides of the van. The idea is to add mass and therefore reduce reverberation of the panels. I’m undecided as to how important this is as the plan was to fix insulation to the walls, floor and ceiling, which would then surely just do the same job? Anyway, for significantly less than something actually marketed for the job, the flashing works just fine. I realised when I came to insulate the ceiling that I still hadn’t put any flashing on the ceiling and had now finished the roll. However, on my last van I didn’t put any on the ceiling either, and lived to tell the tale, so I reckon it’ll be ok this time too!

Insulation
Again, having some experience from my last van, this is something I’ve not put too much pressure on. I’ve upgraded from last time where I used Rockwool-type stuff (and didn’t insulate the ceiling at all as it was translucent and I enjoyed the natural light coming through more than the improved thermal efficiency) and this time used mostly celotex foam board – 25mm on the floor and ceiling, and 50mm on the walls. This stuff is frightfully expensive in the shops near me (£39 for 120x240 50mm sheet in Wickes) but a bit of shopping around on google turned up some for half the price. Delivery was £25 but I still made a big saving vs buying from a store.
I started by laying 25mm batons of wood along and across the floor, the idea being that these provide a frame for the floor to rest on and stop the 25mm insulation board from being damaged underfoot. I tried to be smart and measure the surface area of the floor, subtracting the widths of the wood batons and then dividing the celotex sheets in a way that would hopefully minimise waste. This got super complicated as things such as raised ridges of the floor, and my poor maths, meant that it was much easier to do it by eye (and in the end I had more than enough so needn’t have worried).

With the insulation down on the floor I sealed it all up with aluminium tape (more on that later) and then put back the 9mm plywood floor that was in the van when I bought it, now sanded and varnished.

The walls and ceiling were done in a similar way, with spay adhesive used to hold the insulation boards in place after they’d been cut to fit in the dead space of the panels. The empty space in the beams was filled with Loft Roll (picked up on sale), and some awkward areas were filled with expanding foam. I’ve read a few things (mainly aggressive facebook comments by gentlemen of a certain age on van building pages) that suggest expanding foam is a poor choice as it can hold moisture and lead to rust. However, I’ve also seen lots of other people use it in conversions, and I think it’ll be just fine. If there’s anything dramatic to report I’ll be sure to let you know.

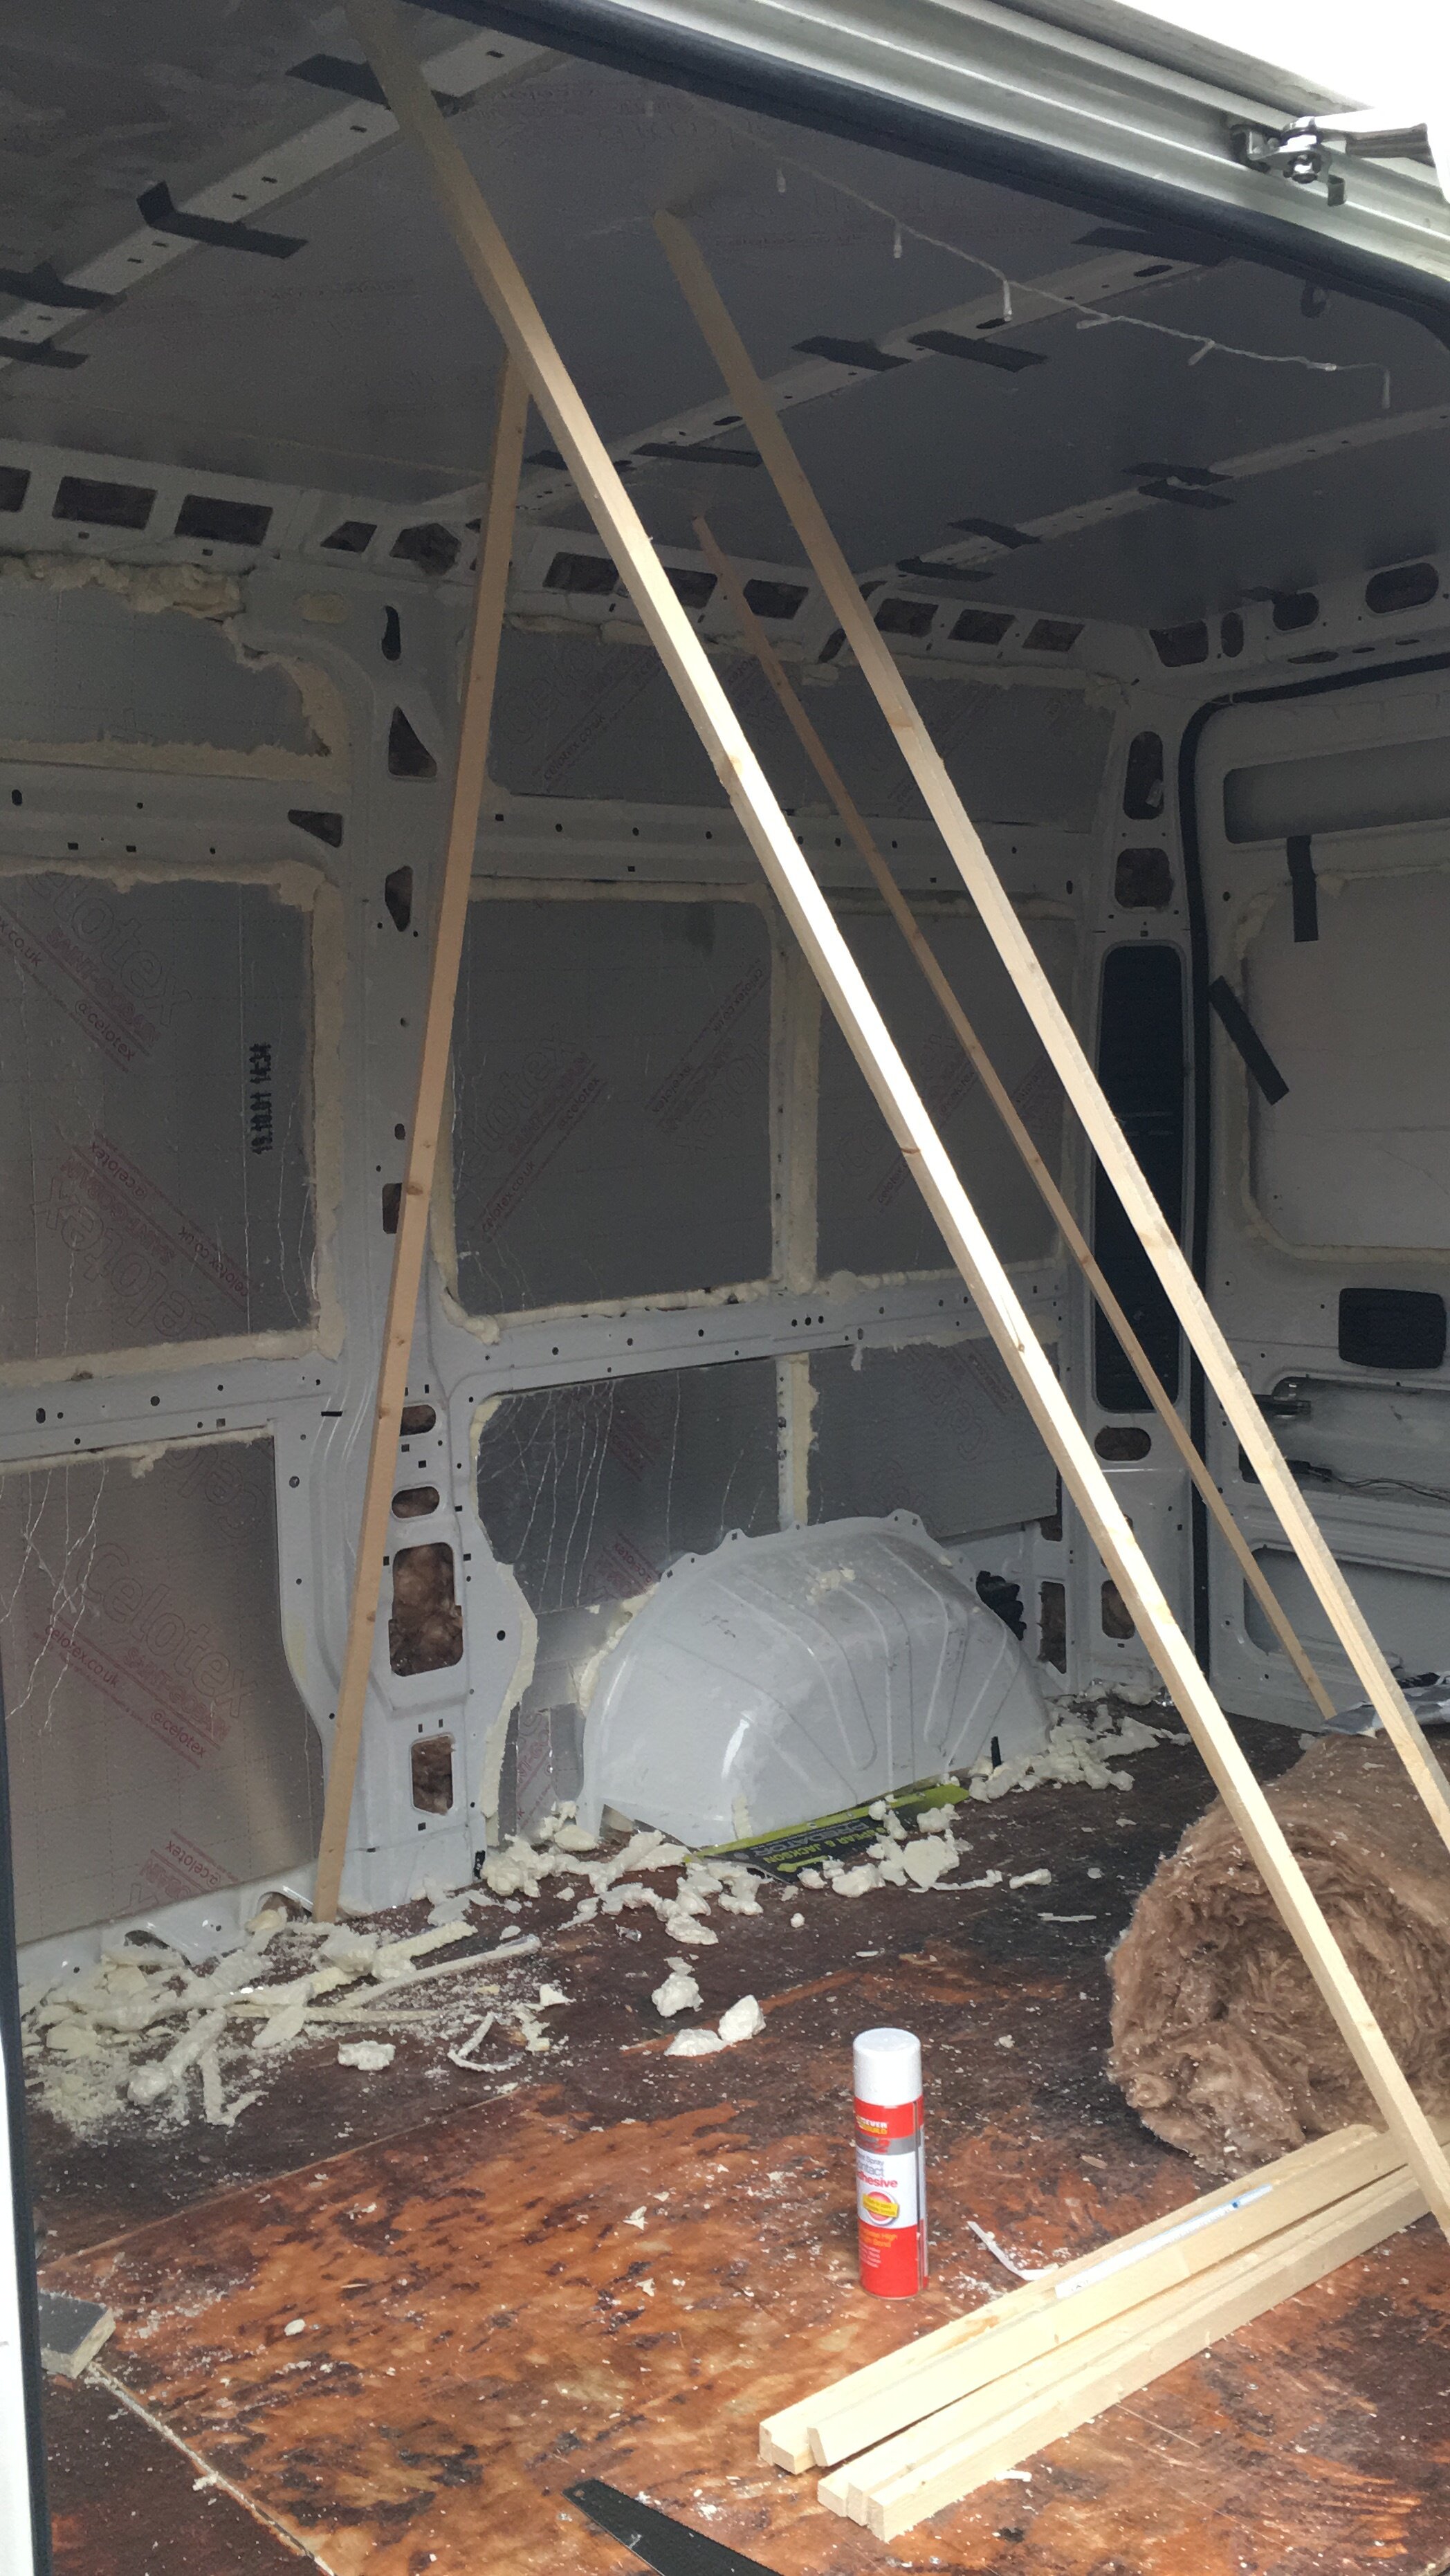
After this I screwed some batons of wood to areas that I thought would be handy to be able to screw into later in the build.
Window
I’d been torn for a while on what to do window-wise. Initially thinking I’d do without, then thinking maybe just a couple of small ones for ventilation, and eventually going for a fixed (non-opening) window the size of a car windscreen! My thought process went something like this: I didn’t like the windows that had already been put in my last van, and would rather of had non. But the roof on my last van let in a lot of natural light and that wasn’t going to be the case with this van. I then thought about steam from cooking and of overheating on hot days, and so thought that small opening windows would be good, one by the kitchen area and one in the back door by the bed, to allow for a bit of a breeze on stuffy hot nights in Spain one day… But the positioning of the beams meant that I couldn’t put a window by the kitchen, and I was also conscious of not just throwing in random windows and having the outside of the van look like a bit of a Frankenstein’s Monster! (I’m starting to think I’ve changed since my LDV days! Am I a van snob now!?). So in the end I went with a large window in the back panel that’s from the Citroen factory (so suits the van exterior) and will be big enough to sit and look out of at a view. I’ll put a skylight in the roof for ventilation around the kitchen, and can always add a window in the back door later down the line if I need to.
That idea of being able to go back and change something in the future brings me onto my next point. You are 100%, unarguably, supposed to put your windows in before you fix your insulation in place, however, I did the insulation first, then removed a bit for the window, and it’s been fine. Nothing in a conversion is set in stone and irreversible. Even the holes you cut in the sides or roof for windows/skylights etc can be sealed over, it wouldn’t be easy or ideal, but it is possible.
I’d also been pretty set on fitting the window myself because a) I like to do things myself, and b) I think it’s pretty impressive to say you’ve put your own windows in! However, after noticing a few things such as the sheer size of the glass (55 x 135), that the rail for the sliding door would be an obstacle to overcome, and that actually for about £50 more than the cost of the glass and fitting kit I could get a professional to do it for me, I decided to just put my hand in my pocket and let someone else deal with the stress! Best decision I could have made as I’m well chuffed with the end result!

Vapour Barrier
The last thing in this stage of the build was the installation of vapour barrier. This is also the last item on my list of highly controversial topics involving van conversions. I’m brand new to vapor barrier, my last van didn’t have any, and it was this that made me less concerned about it than I might once have been; when my last van was scrapped I took off various pieces of cladding to check on the insulation which I’d been warned would have become a soggy smelly mess and behind that would be rusting metal. What I found was bone dry and in the same condition as the day I’d fitted it. So why bother? Well mainly because it’s something new to try and also because it’ll probably add to the insulation if nothing else.
The purpose of the vapour barrier, as I understand it, is to protect the metal of the van and the insulation from moisture (steam from cooking, moisture exhaled while sleeping, damp on wet clothes etc) and therefore avoid rust and bad odours.
I used rolls of foil bubble wrap often referred to as Reflectix (although mine was not that brand and is in fact a mismatch of what was on sale (in Wickes and B&Q). I fixed it to the walls and ceiling with spray adhesive, and then sealed the gaps in between the sheets with aluminium tape.

This was when I noticed a few issues. Firstly, it’s impossible to make this an airtight seal. The nature of a van, and the beams and channels used for wiring of things such as lights, means that you can’t seal off everywhere that moisture might reach, so it feels pretty pointless. This was just more reason to not be overly concerned about the importance of the job, which was nice. The second was that it would be really hard to spot the batons of wood and beams that I would use to attach cladding and furniture to later in the build. I got round this by marking their locations with a pen as I went. If I was to do it again I’d probably just use transparent plastic sheeting instead of the foil, or just not bother. The third issue is that to attach anything to these beams and batons, I’ll be drilling through the vapour barrier, piercing it and therefore surely rendering it pointless? After all of this I’ve decided to take vapour barrier with a pinch of salt and not lose any(more) sleep over it. Plus, I’m going to have a woodburner anyway so if anything does get damp it’ll dry out very quickly after a few hours of having the fire lit.


The main bonus is that the foil in the vapour barrier will stop the government from spying on my thoughts!

With all of that out of the way I was ready for the next stage of my build. It should have been the cladding but last time that had been a right mare of a job, so I decided to just build my bed instead as at least then I’d have ticked off and another job and have a win under the belt before starting a pain of a job!
If nothing else, I hope that this post makes someone who is converting a van (or doing any other project) realise that there are lots of right ways of doing things, but really not many wrong ones.